Developer Guide

Introduction
This is the developer guide for Inventoryinator a brownfield project evolved
from AddressBook3.
Inventoryinator is a desktop app for managing game inventories. Our app is optimized for use via the typing of commands, while your inventory is shown on our Graphical User Interface (GUI). If you can type fast, Inventoryinator can get your inventory management tasks done faster than traditional GUI apps.
If you would like to take part in developing Inventoryinator, this Developer Guide will help you get familiarized with the architecture and provide an overview of the implementation of the features and components. You may use the table of contents below to easily navigate to sections in this document.
- Introduction
- Documentation, logging, testing, configuration, dev-ops
- Setting up, getting started
- Design
- Feature Implementation
- Appendix: Requirements
Documentation, logging, testing, configuration, dev-ops
- Documentation guide
- Testing guide
- Logging guide
- Configuration guide
- DevOps guide
- End User Persona
- Usecases
- Implementation Details and Sequence Flow
Setting up, getting started
Refer to the guide UserGuide.
Design
This section will elaborate on the design and software patterns applied in Inventoryinator.
Architecture
This application applies the MVC pattern.
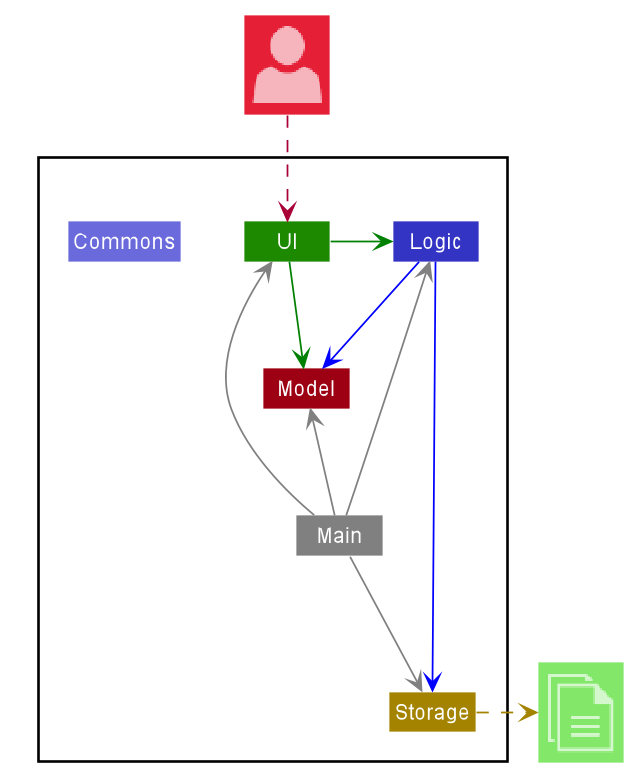
The Architecture Diagram given above explains the high-level design of the App. Given below is a quick overview of each component.
Main has two classes called Main
and MainApp.
It is responsible for:
- At app launch: Initializes the components in the correct sequence, and connects them up with each other.
- At shut down: Shuts down the components and invokes cleanup methods where necessary.
Commons represents a collection of classes used by multiple other components.
The rest of the App consists of four components.
UI: The UI of the App.Logic: The command executor.Model: Holds the data of the App in memory.Storage: Reads data from, and writes data to, the hard disk.
Each of the four components,
- defines its API in an
interfacewith the same name as the Component. - exposes its functionality using a concrete
{Component Name}Managerclass (which implements the corresponding APIinterfacementioned in the previous point.
For example, the Logic component (see the class diagram given below) defines its API in the Logic.java interface
and exposes its functionality using the LogicManager.java class which implements the Logic interface.
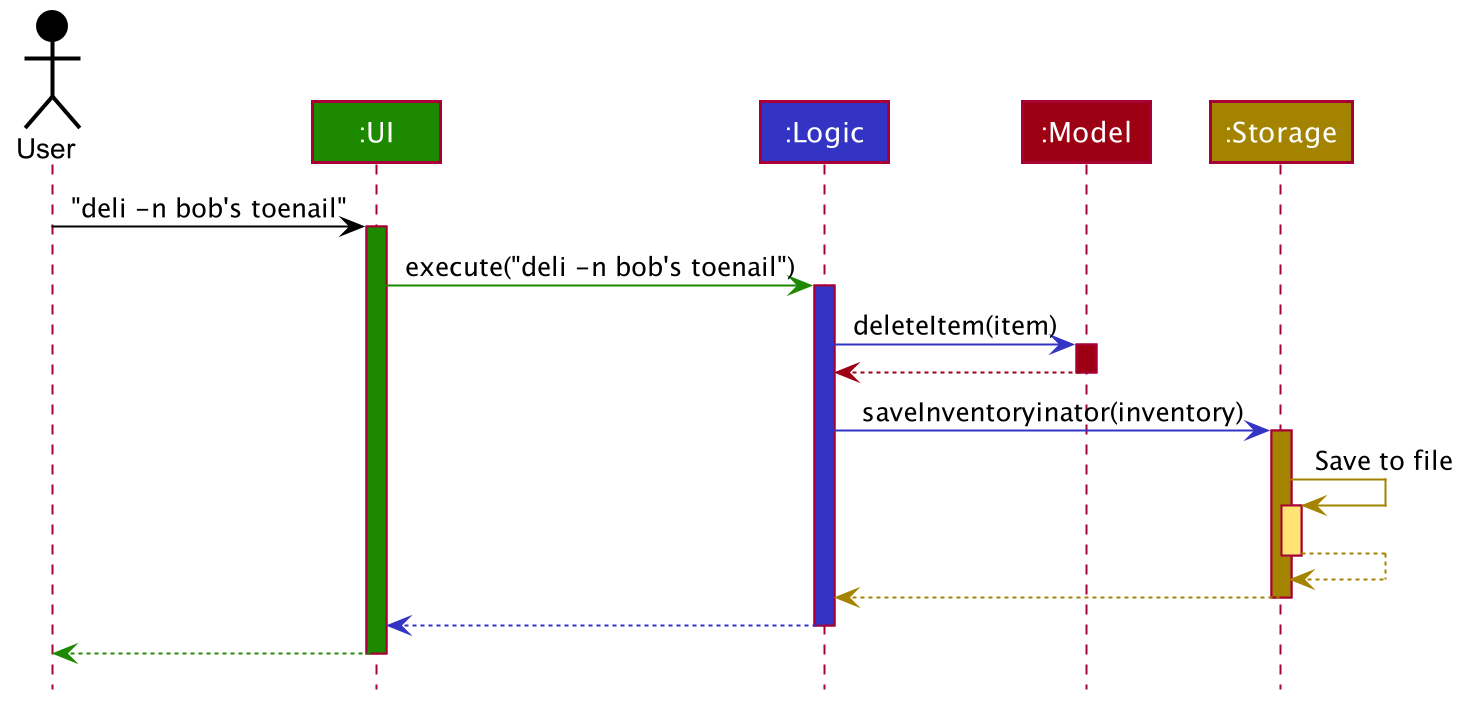
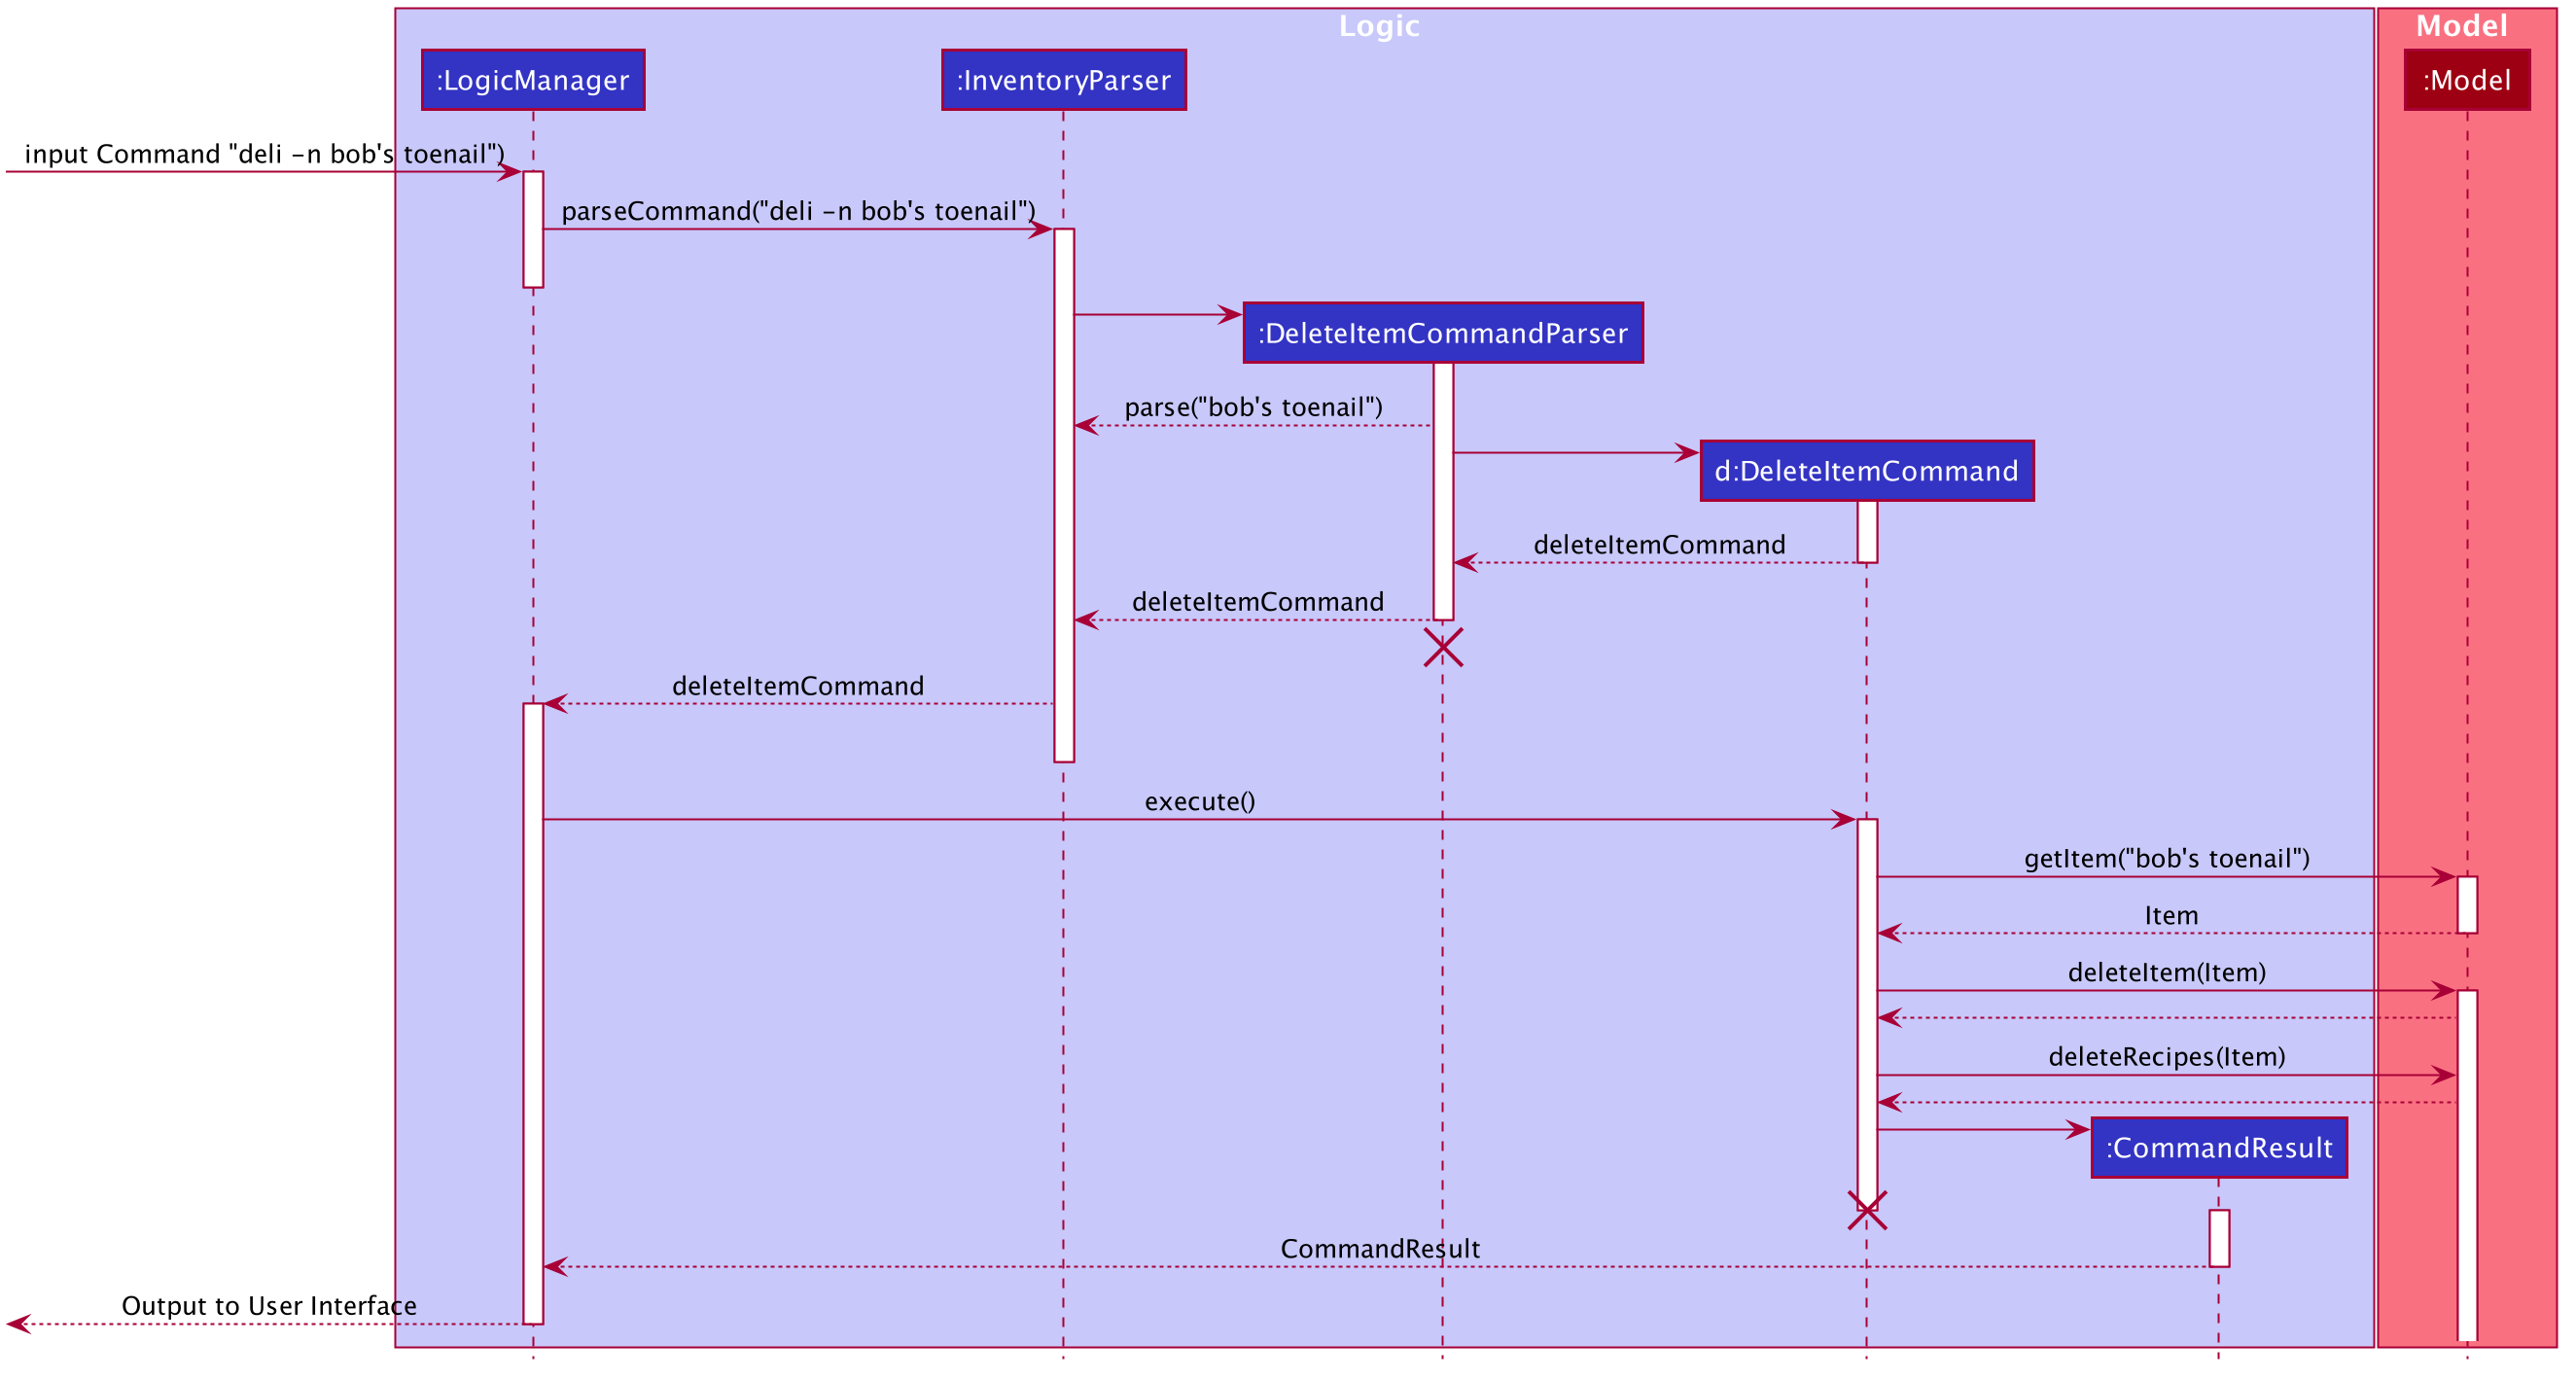
How the architecture components interact with each other
The Sequence Diagram below shows how the components interact with each other
for the scenario where the user issues the command deli -n bob's toenail.
The sections below give more details of each component.
UI component
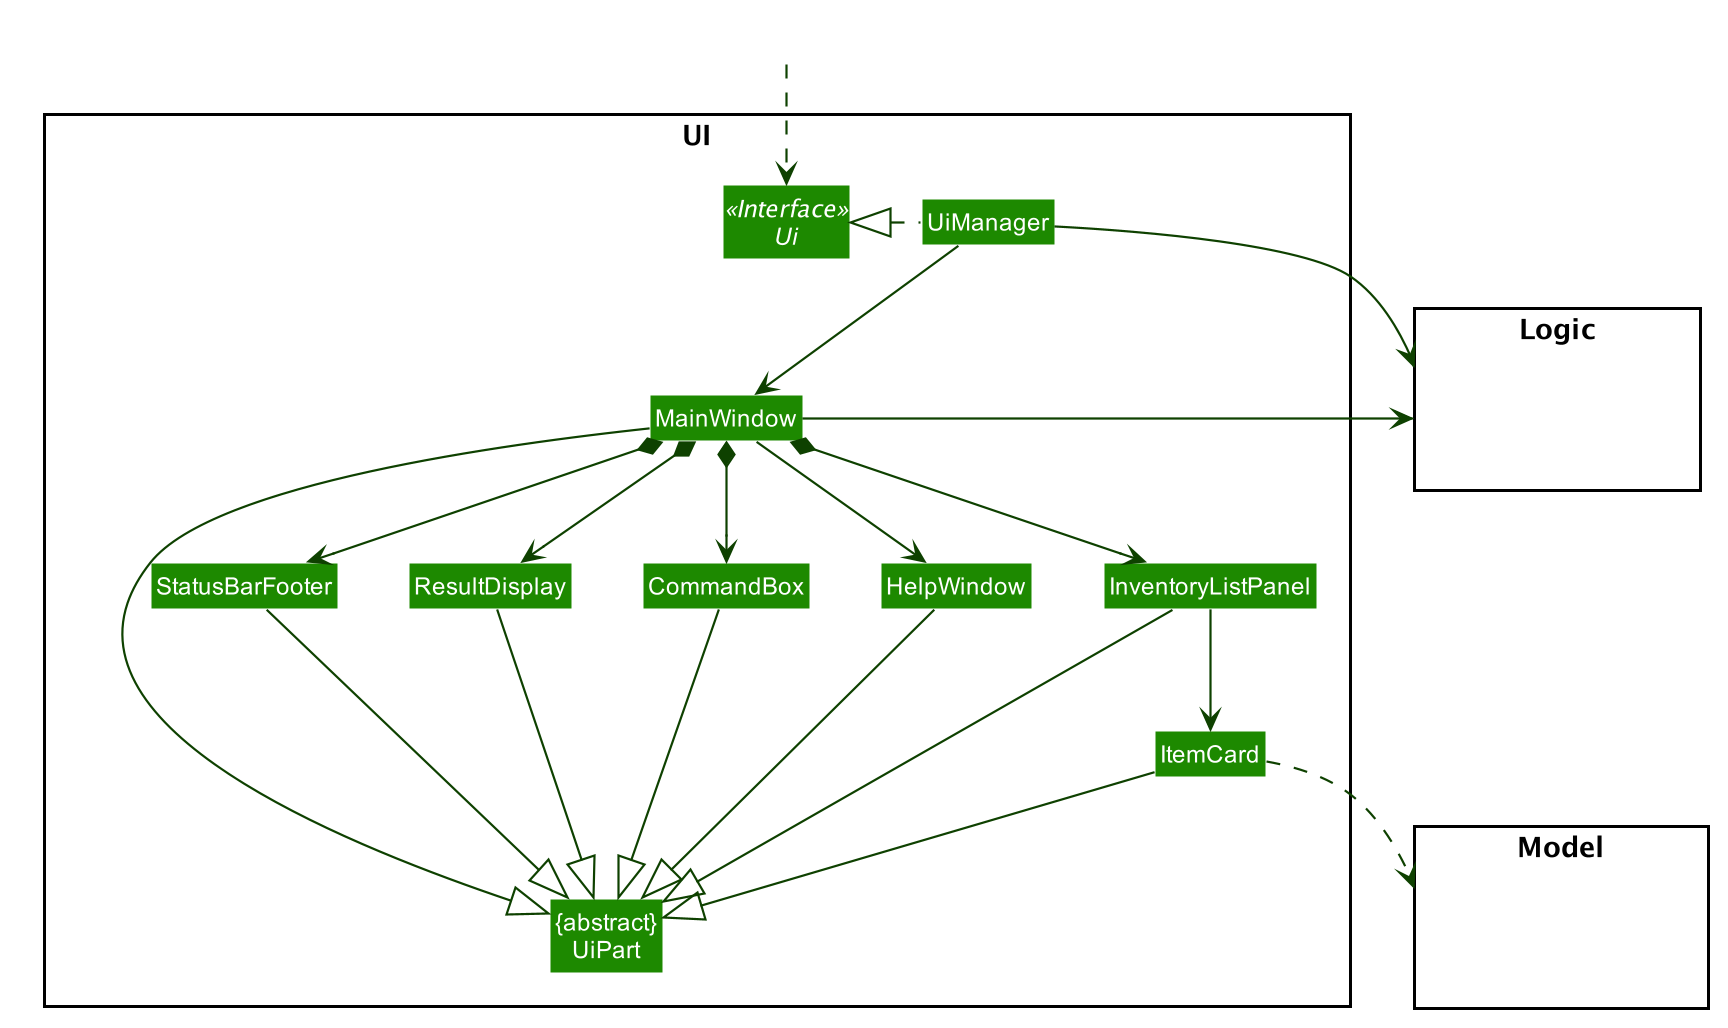
API :
Ui.java
The UI consists of a InventoryMainWindow that is made up of parts e.g.CommandBox, ResultDisplay, InventoryListPanel,
StatusBarFooter etc. All these, including the InventoryMainWindow, inherit from the abstract UiPart class.
The UI component uses JavaFx UI framework. The layout of these UI parts are defined in matching .fxml files that
are in the src/main/resources/view folder. For example, the layout of the
InventoryMainWindow
is specified in InventoryMainWindow.fxml
The UI component,
- Executes user commands using the
Logiccomponent. - Listens for changes to
Modeldata so that the UI can be updated with the modified data.
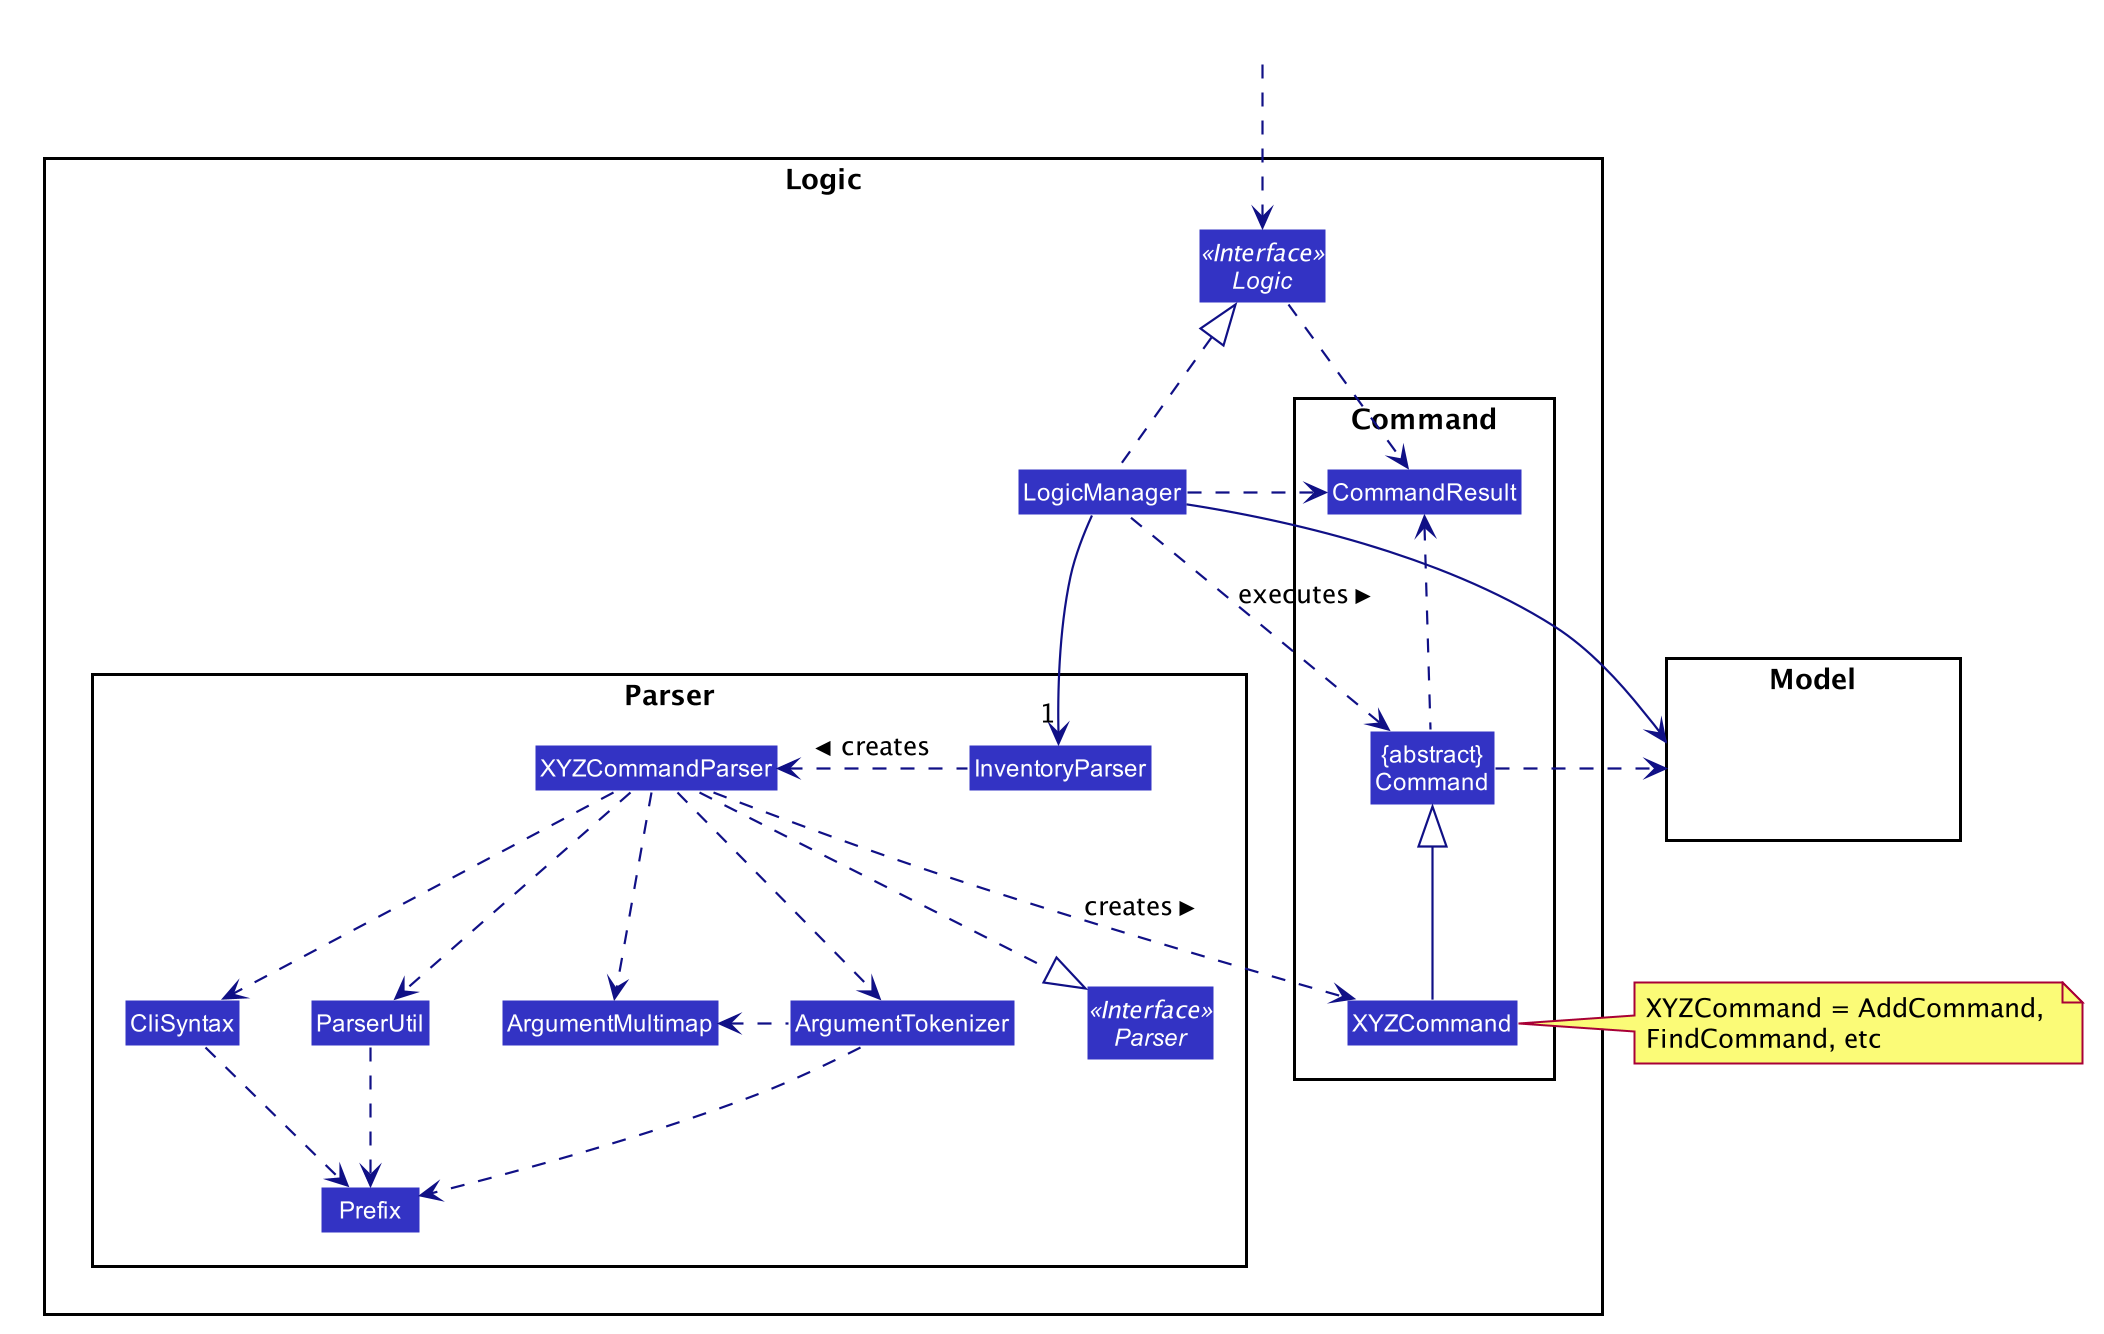
Logic component
The Logic component of Inventoryinator applies a command behavioural design pattern.
API :
Logic.java
Logicuses theInventoryParserclass to parse the user command.- This results in a
Commandobject which is executed by theLogicManager. - The command execution can affect the
Model(e.g. adding an item). - The result of the command execution is encapsulated as a
CommandResultobject which is passed back to theUI. - In addition, the
CommandResultobject can also instruct theUIto perform certain actions, such as displaying help to the user.
Given below is the Sequence Diagram for interactions within the Logic component for the execute("deli -n bob's toenail") API call.
Model component
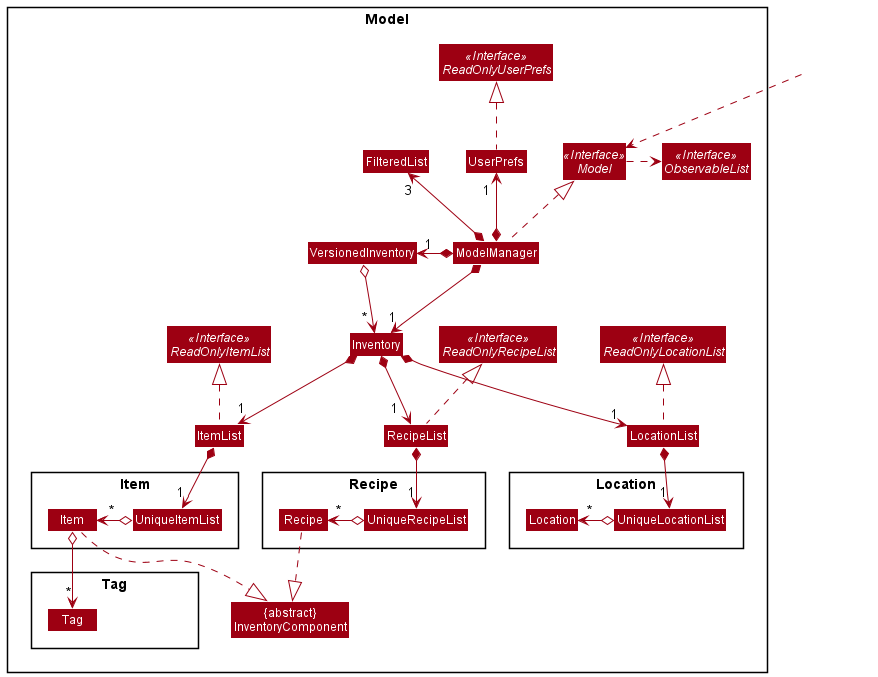
API : Model.java
The Model,
- stores a
UserPrefobject that represents the user’s preferences. - stores the Inventory data like items, recipes etc.
- exposes an unmodifiable
ObservableList<Item>andObservableList<Recipe>which can be ‘observed’ e.g. the UI can be bound to this list so that the UI automatically updates when the data in the list change. - does not depend on any of the other three components.
Storage component
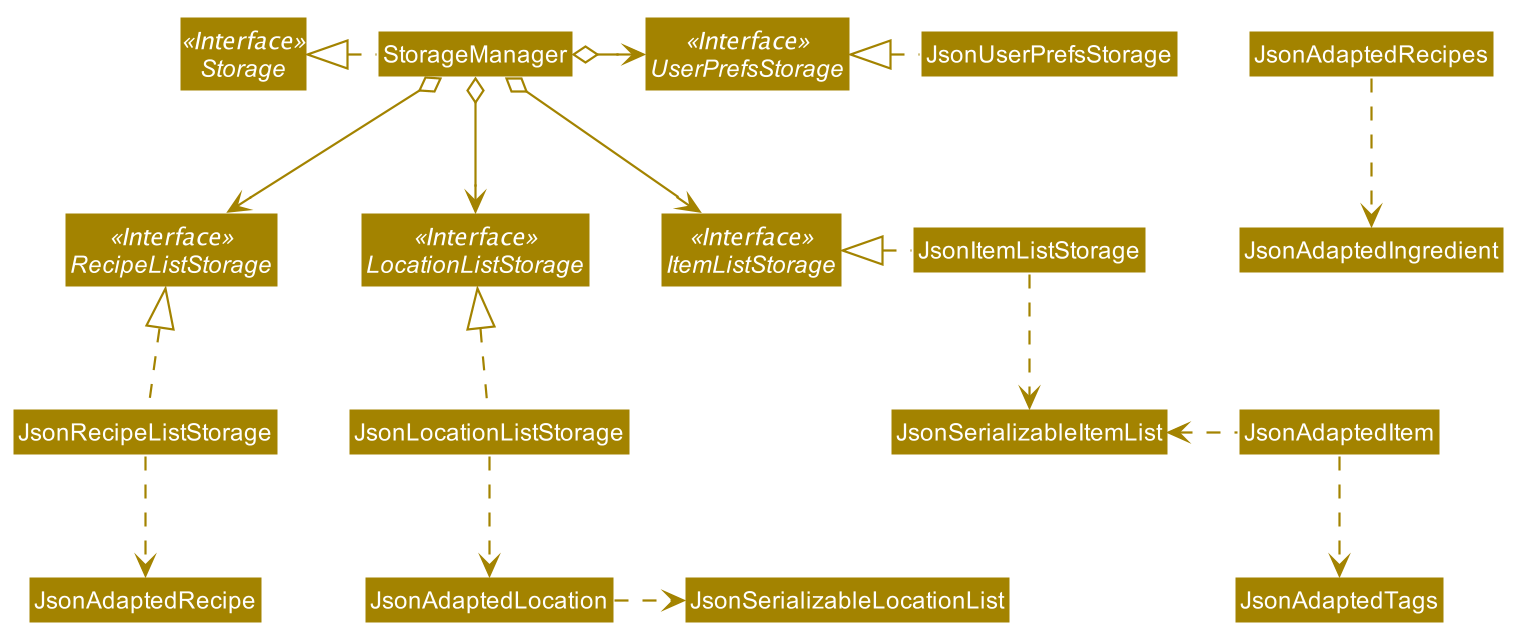
API : Storage.java
The Storage component,
- can save
UserPrefobjects in json format and read it back. - can save the
ItemListdata in json format and read it back. - can save
RecipeListdata in json format and read it back. - can save
LocationListdata in json format and read it back.
Common classes
Classes used by multiple components are stored in the seedu.address.commons package.
Feature Implementation
This section describes some noteworthy details on how certain features are implemented.
Add Quantity feature
The add quantity feature allows users to easily modify the quantity stored of a recorded item,
without having to using edit.
Implementation
AddQuantityToItemCommand facilitates the addition of a user-input quantity to an existing Item.
This command is a specific invocation of an EditItemCommand that only modifies the Item’s quantity,
and instead of replacing the quantity by a new value in EditItemCommand, the user-input quantity
is added to the existing Item’s Quantity.
This added Quantity can be negative, however the final Quantity of the
modified Item cannot be below 0.
AddQuantityToItemCommand is dependent on EditItemCommand and utilises it to execute its
intended behaviour. It builds a EditItemDescriptor by searching for the Item’s attributes.
Using the current Quantity and the user-input, it calculates an updated Quantity. It then
constructs and executes an EditItemCommand to replace the Item’s Quantity with the
updated value.
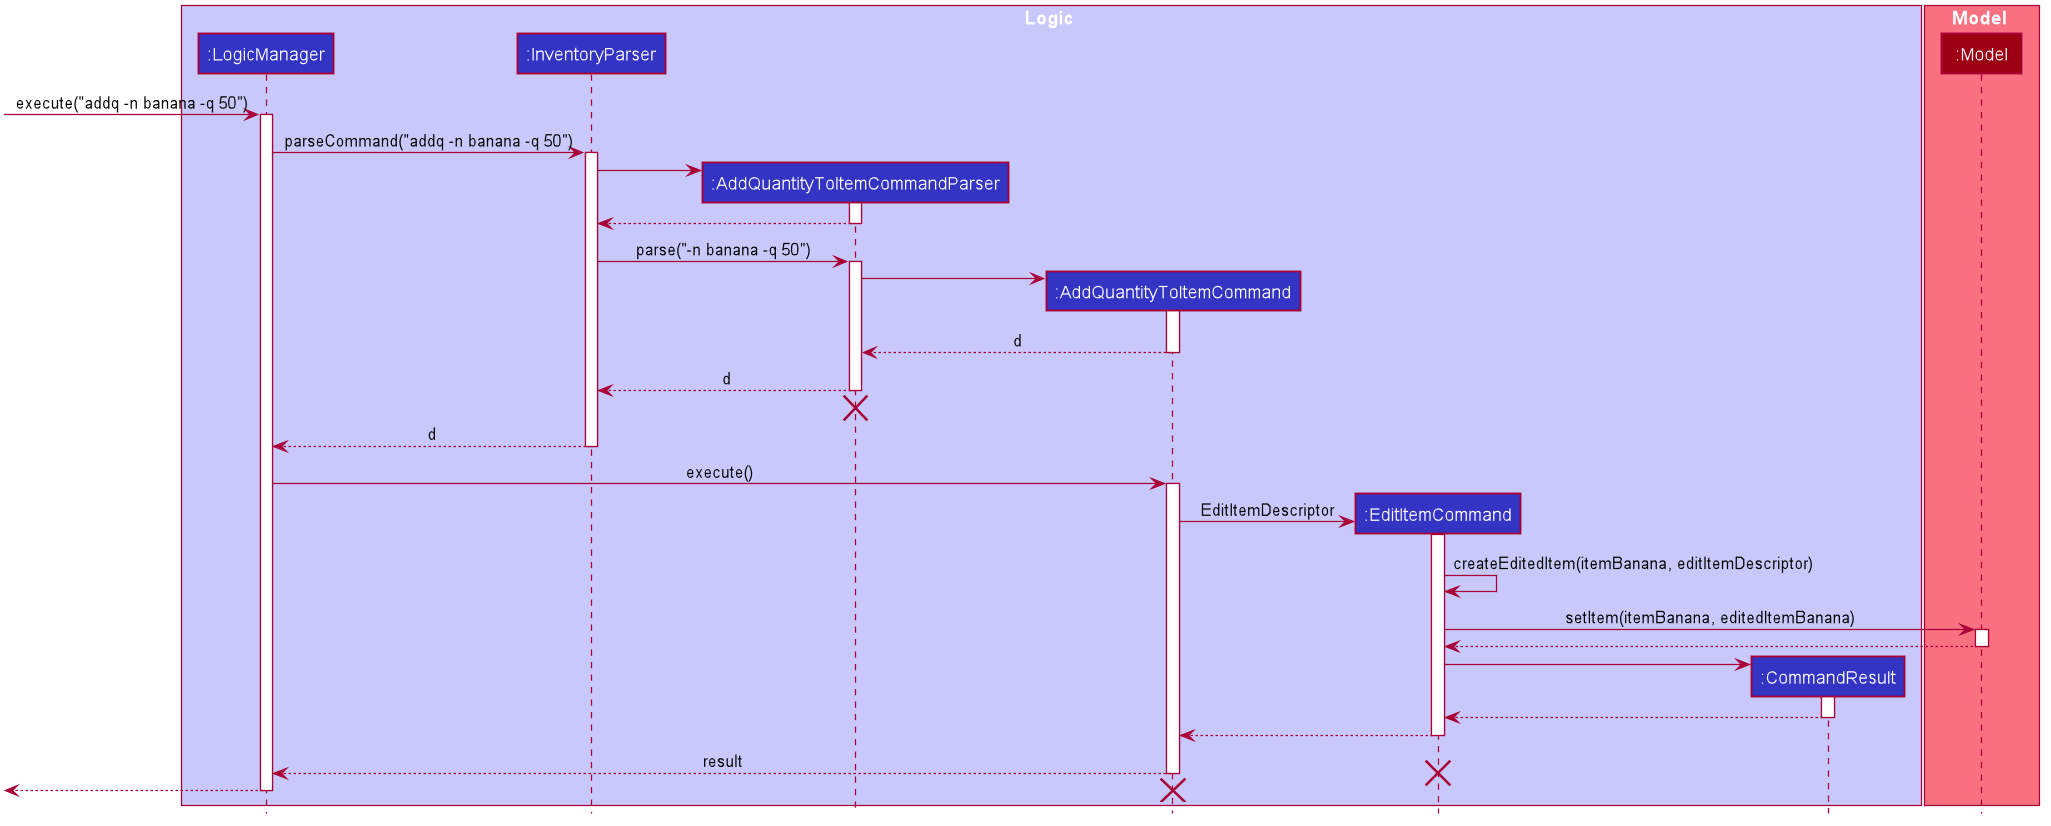
The sequence diagram for the execution of an AddQuantityToItemCommand is as follows:
The Item with name banana is denoted as itemBanana, and the original quantity assumed to be 20.
View detailed item feature
The view detailed item feature allows users to view the detailed information of a recorded item, as compared to the default list display of all items which may truncate some information.
Implementation
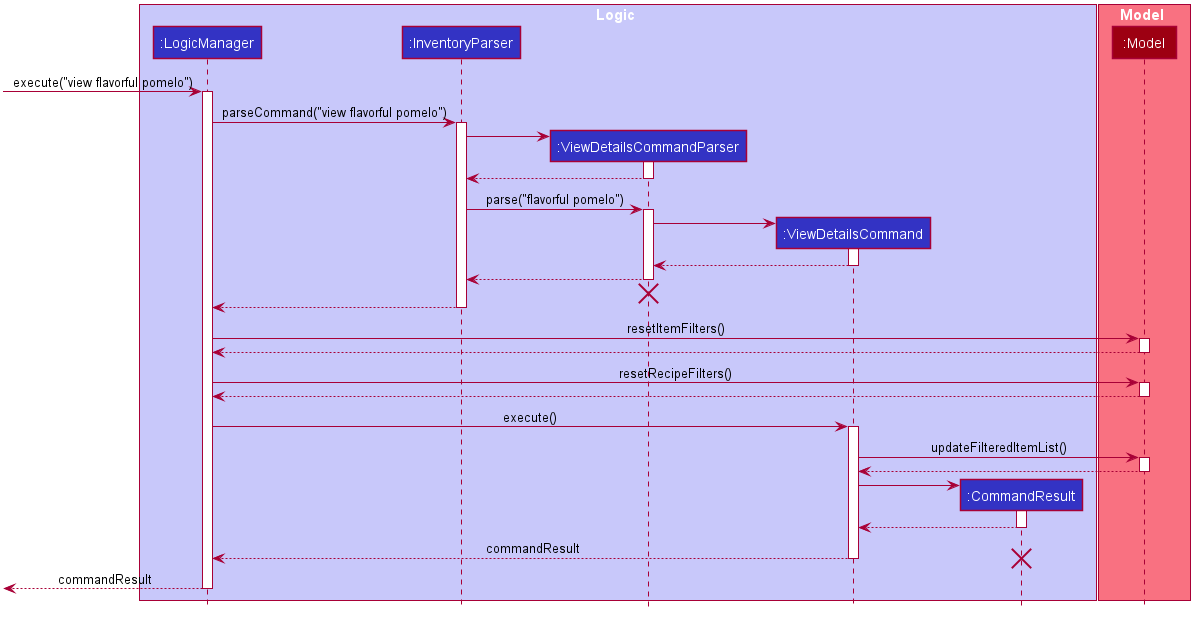
During execution of view command, LogicManager detects that it is a view command, then has InventoryParser parse
the item name that the user has input using ViewDetailsCommandParser. After parsing, LogicManager has the
Model reset it’s current filters for the lists of items and recipes. Then, LogicManager executes the
ViewDetailsCommand, which applies it’s own filter to the list of items, such that only the exact item
the user has requested remains, and also parses the recipes to find recipes that creates this item.
After executing the view command, LogicManager sends feedback to InventoryMainWindow that the command has a
DisplayedInventoryType of DETAILED_ITEM, which prompts InventoryListPanel to change the display card of items
into a more detailed display card on the GUI.
This is the sequence diagram of view detailed item command:
Reasoning behind current implementation
View detailed item was first implemented with the idea of changing GUI on demand, but we eventually realised due to
AB3’s abstraction, Model and Logic can’t communicate directly, which means we could not change the GUI during
execution of the command. It was only after looking at the help command that we discovered how AB3 used LogicManager
to communicate with MainWindow by checking for a certain help flag in the CommandResult that
LogicManager returns. This information allows CommandResult to know when to make changes to the GUI.
At last, this discovery has led to us changing the implementation of CommandResult by adding more flags to support
our new commands that will affect the GUI. Specifically, the check for whether to use a more detailed card to display
items is through checking the DisplayedInventoryType of CommandResult.
Alternative implementation
One problem with the current implementation is that it is rather inconvenient to find the correct file to make changes,
due to AB3’s amount of abstraction. An alternative implementation is to create an association class between Logic
and Model, that allow for Logic to access Model’s FilteredItemList directly, which would greatly simplify
the sequence of command flow (as well as the sequence diagram). However, the amount of resources and effort required
to implement such an association class, as well as the additional need for testing and debugging this new association
class, might ironically lead to bigger time wastage than looking through each class involved in the execution of the
view command.
Delete Item Feature
DeleteItemCommand facilitates the deletion of an existing Item. This deletion cascades to impact any
Recipe in the list of recipes that are associated with this item, as such, these matching Recipe are also deleted.
This command was implemented to resolve the userstory, regarding “As a user I want to delete a item so that I can remove item that I no longer need to track.”
Implementation
During the execution of an DeleteItemCommand, as referenced from the architecture sequence diagram,
the input is accepted by the GUI, and passed into the LogicManager that calls InventoryParser to parse the command
word and determines that command is a DeleteItemCommand. This also cleans the user input by removing the command word.
Then InventoryParser calls the specific DeleteItemCommandParser#parse(Input) to read and parse the given field, in this case,
“-n Bob’s Toenail”. This process reads the given input string, and checks for validity. Then assuming no ParseException occurs,
the resulting DeleteItemCommand is created for the input item.
This DeleteItemCommand is returned up the method call stack to the LogicManager where the Command#execute(model)
occurs.
This is where change is made into the stored Model within the DeleteItemCommand. Model is used as an abstraction of the internal
details of cached storage.
First a query is made to the Model to check that the Item exists, and if so, deletes the item from the the Model.
Then, a query is made for any Recipe in the Item, or has the Item as a product of the Recipe and this reference is
then deleted from the product.
Lastly, the deleted Recipe also cascade their Recipe deletion to any items that contain the Recipe.
This concludes the deletion routine.
After successful deletion occurs, the resulting CommandResult with a success message is returned
successfully to the LogicManager and then displayed on the GUI.
The following sequence diagram details in depth how the DeleteItemCommand works:
Initial user input is shown in full, but as the system transforms the input, inputs and returned values abstracted out into apt representations.
Alternative Implementation and Reasoning against its implementation
One problem with the current implementation is that there is a deep coupling between
the internal structure of the Model, that is namely the FilteredItemList and FilteredRecipeList,
with no direct methods manipulating these classes from the ModelManager facade design pattern itself.
This causes some direct manipulation of non-neighbouring classes, which violates
Law of Demeter.
However, the facade design pattern applied to ModelManager also prevents excessive bloat and coupling.
Hence refraining from this implementation reduces the size of the class significantly,
improving readability of the code and preventing ModelManager from entailing extra responsibility.
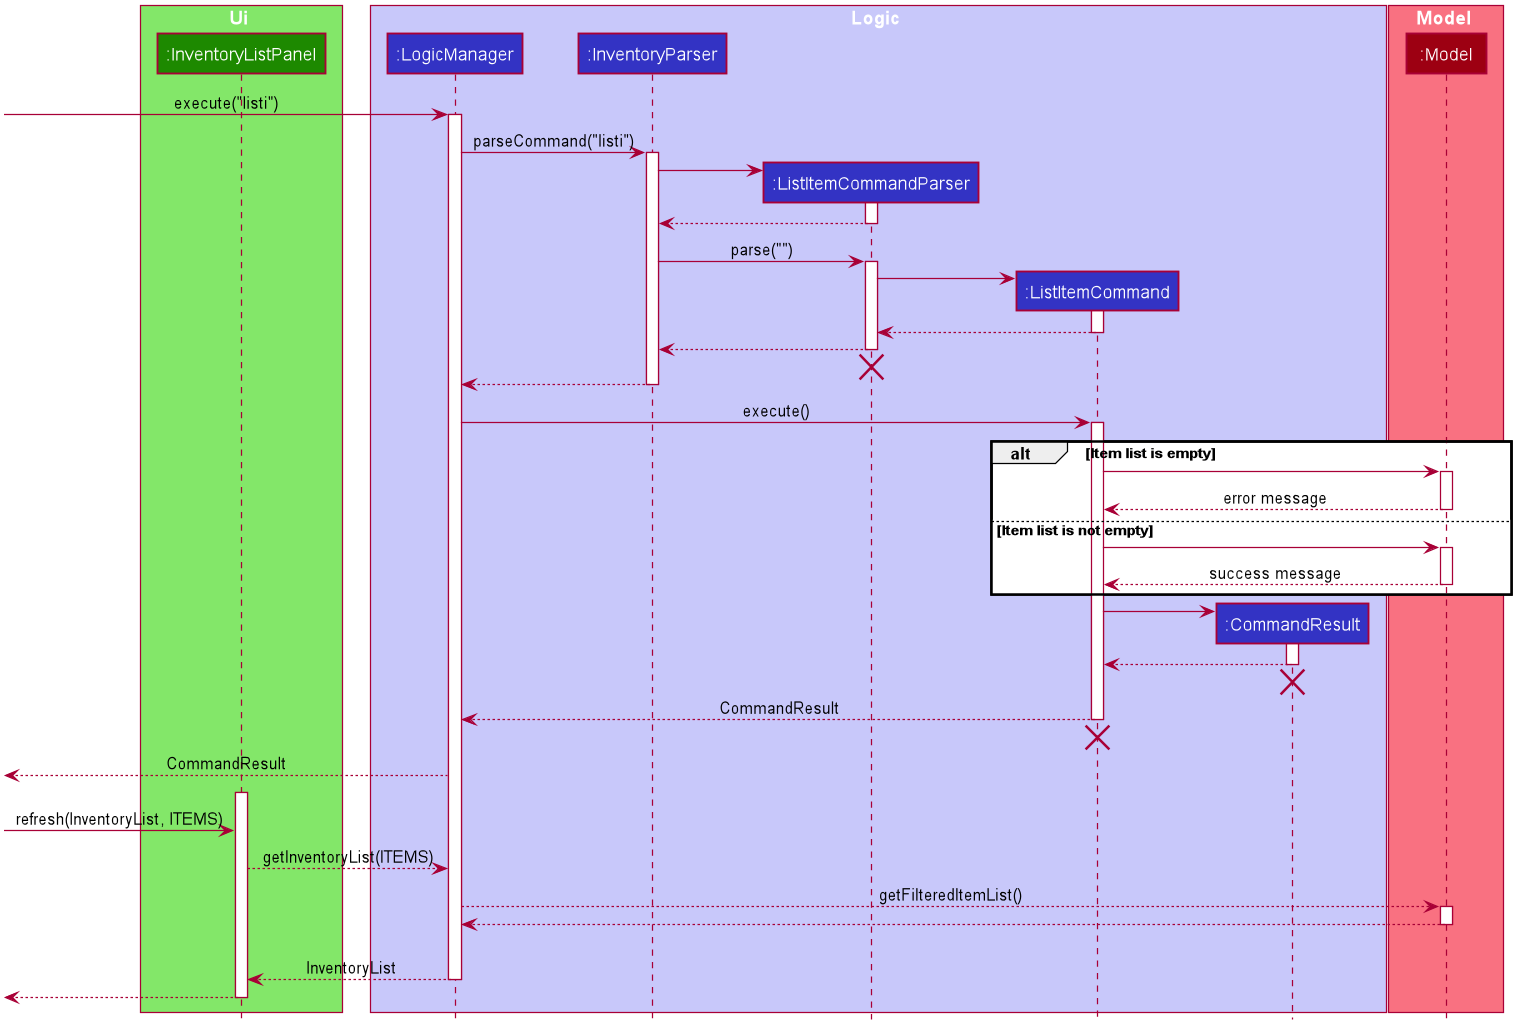
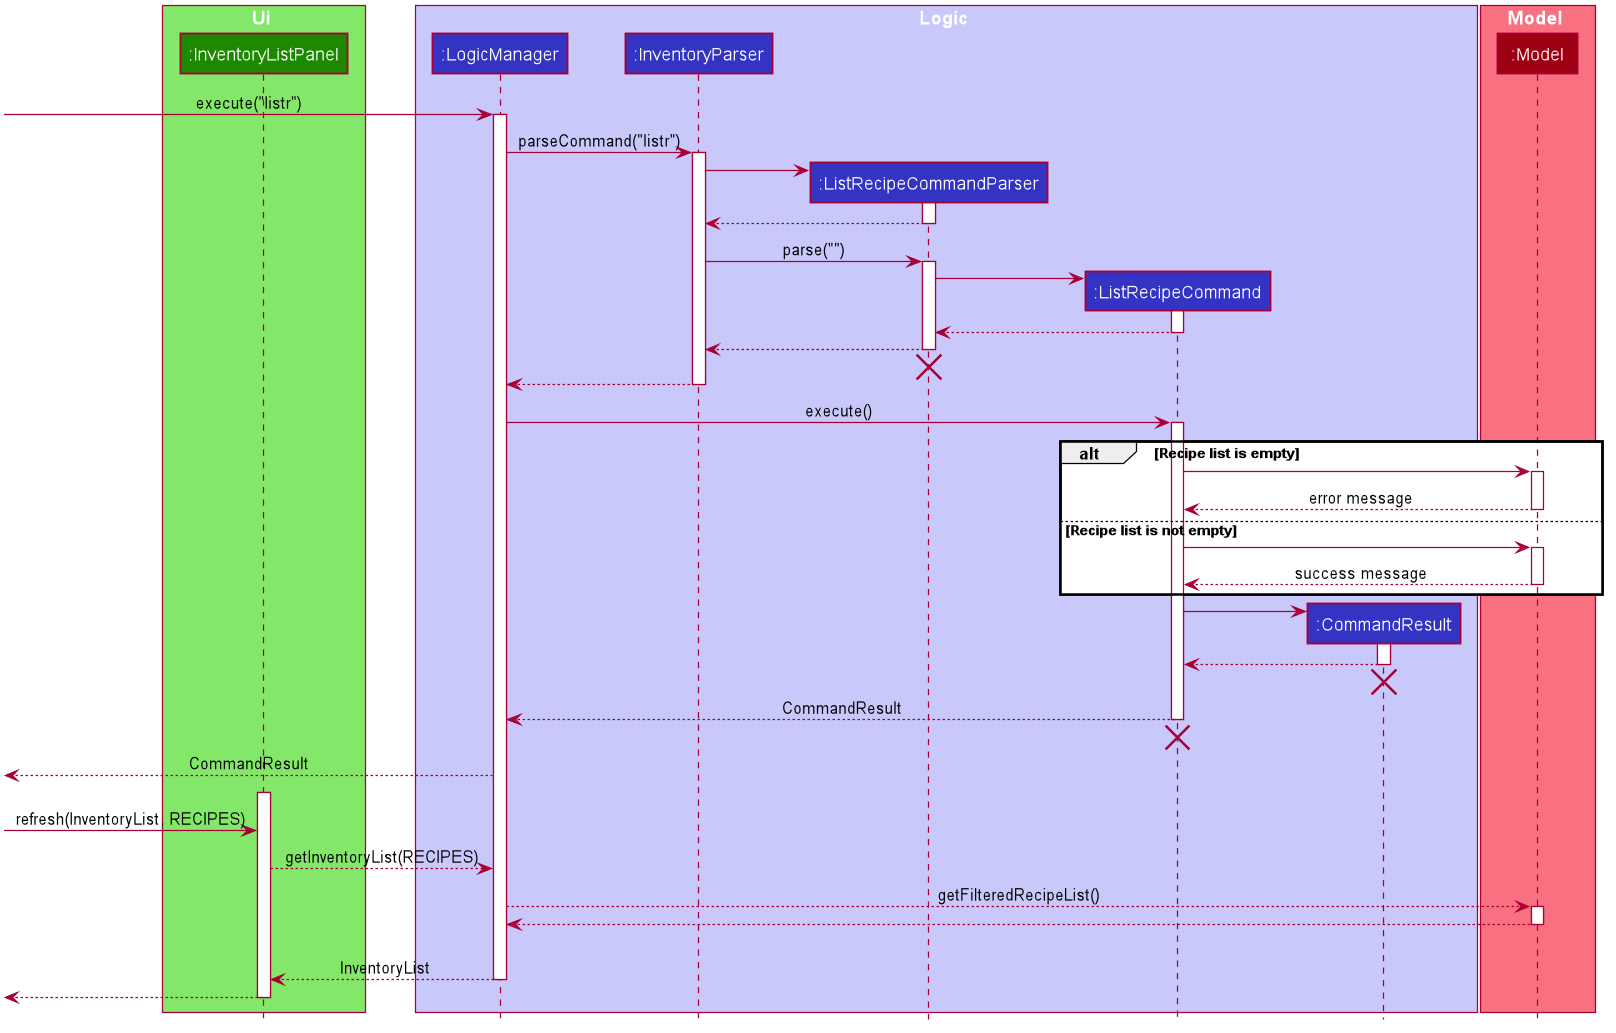
List item/recipe feature
The list item/recipe feature allows the user to toggle between viewing the list of all items or recipes in the current inventory.
Implementation
There are three main view modes, which are: display of all items, display of all recipes, and viewing of detailed item. The list item and list recipe features facilitates the switch between viewing the item list and recipe list.
In InventoryMainWindow, whenever a command is executed, the InventoryListPanel is refreshed,
to be filled with the relevant inventory list.
This list is retrieved by getInventoryList in LogicManager, based on the current view mode.
For the list item, list recipe and view details commands, the relevant display mode is stored in the CommandResult.
Upon execution, the display mode is passed on from the CommandResult to the InventoryMainWindow, which will store
the current display mode, and pass on to the InventoryListPanel and LogicManager to refresh and retrieve the relevant list.
For all other commands, they will return a CommandResult with UNCHANGED as the inventory type.
This indicates that the view mode should not be changed. The same type of inventory list (updated accordingly)
will be retrieved and displayed. If the user was previously on detailed item view, the item list will be displayed instead.
The following sequence diagram shows how the list items operation works:
The following sequence diagram shows how the list recipes operation works:
Reasoning behind current implementation
In the existing AB3 structure, Model and Logic cannot communicate directly, which means we could not change the GUI
during execution of the command. Therefore, CommandResult was augmented to contain the relevant display mode, and pass
the information back to the Ui section to update the display.
Alternative implementation
A possible alternative implementation which might be more convenient for users would be to include two tabs, and allow the user to switch between the two tabs by clicking the tabs. This will allow for easier, more visual navigation and might be implemented by constructing additional scenes in JavaFX, displaying the scene the user requests to view.
This alternative was not chosen as our target group is defined to be fast typists, and in line with the rest of our commands, which all require CLI input, switching to usage of the mouse would not be convenient. Furthermore, the current implementation is also more extensible, as we can easily mix and match items and recipes to display by filtering the item and recipe lists in the command as required, rather than constructing a new scene from scratch. The implementation here was then adapted to implement the view detailed item command easily, and could also be useful for future developments and extensions.
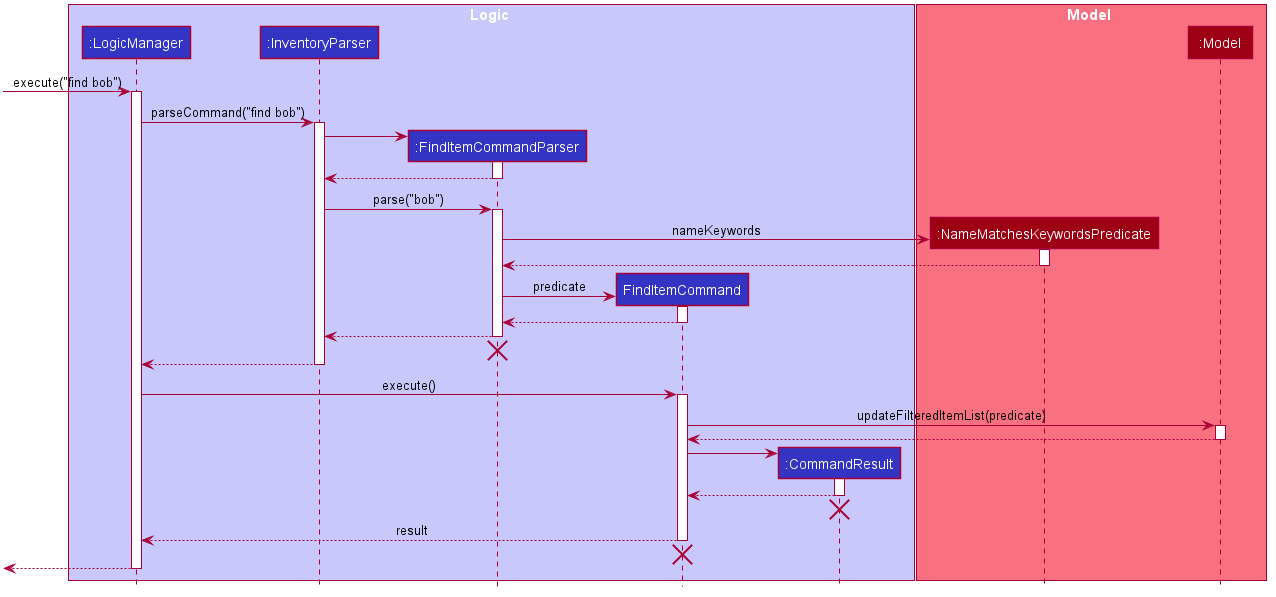
Find items feature
The find items feature allows users to search, case-insensitively, for items using search keys. Item names that match or contain any of the keys will be displayed.
Implementation
The FindItemCommand object facilitates this feature. The search keys are parsed by the FindItemCommandParser which
creates a NameMatchesKeywordsPredicate object and passes it to FindItemCommand. Upon execution, the predicate object
is passed on to Model which updates the filteredItemsList using the predicate. The predicate checks whether an item’s
name matches or contains any of the search keys. case-insensitively. Finally, the FindItemCommand returns a CommandResult,
set to display the filteredItemsList. If there are any items that are found, the number of items found is displayed.
If none are found, a message is shown to the user.
The following sequence diagram illustrates how the find items command works.
Undo/redo feature
The undo/redo feature allows users to undo and redo commands that change the state of the inventory, so that users can undo their mistakes.
Implementation
VersionedInventory facilitates the proposed undo/redo feature. It extends Inventory, with
comprises: ItemList, LocationList and RecipeList and contains the entire Inventory’s undo/redo history,
stored internally as an inventoryStateList and currentStatePointer.
Additionally, it implements the following operations:
VersionedInventory#commit()— Saves the current inventory state in its history.VersionedInventory#undo()— Restores the previous inventory state from its history.VersionedInventory#redo()— Restores a previously undone inventory state from its history.
These operations are exposed in the Model interface as Model#commitInventory(), Model#undoInventory() and
Model#redoInventory() respectively.
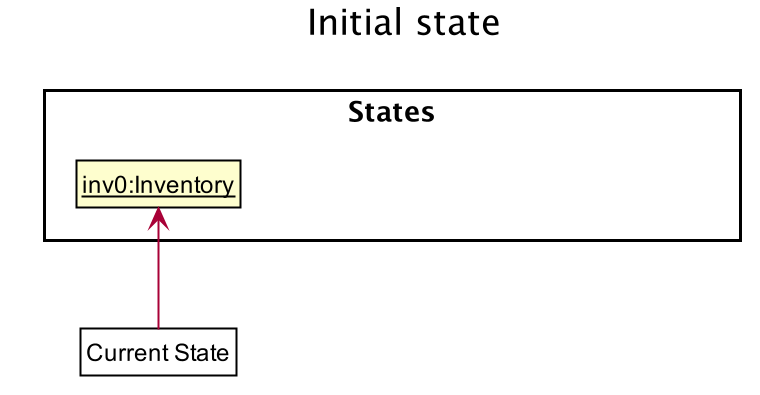
Given below is an example usage scenario and how the undo/redo mechanism behaves at each step.
Step 1. The user launches the application for the first time. The VersionedInventory will be initialized with
the initial inventory state, and the currentStatePointer pointing to that single inventory state.
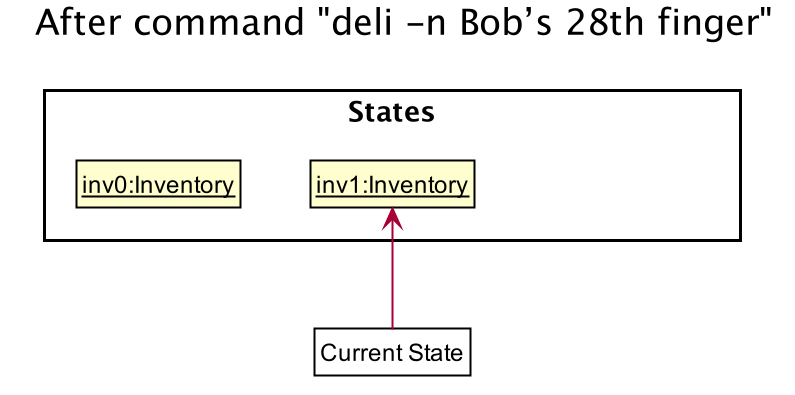
Step 2. The user executes deli -n Bob’s 28th finger (a DeleteItemCommand) command to delete the matching item in
the inventory. The deli command calls Model#commitInventory(), causing the modified state of the inventory
after the deli -n Bob’s 28th finger command executes to be saved in the inventoryStateList, and the
currentStatePointer is shifted to the newly inserted inventory state.
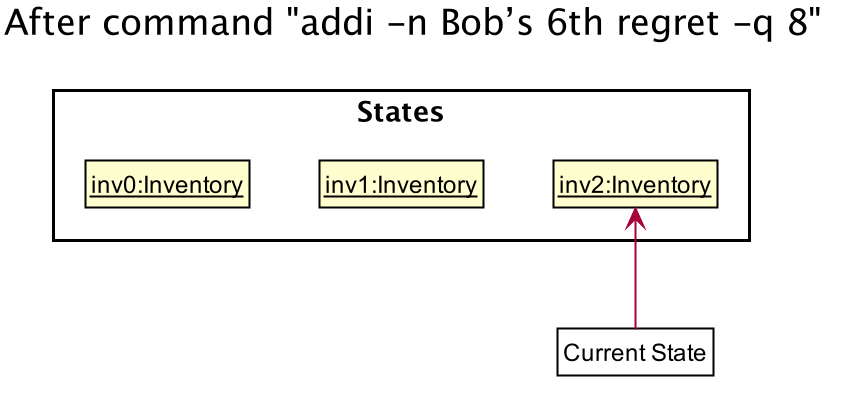
Step 3. The user executes addi -n Bob’s 6th regret -q 8 (a AddItemCommand) to add a new item.
The addi command also calls Model#commitInventory(), causing another modified inventory state to be
saved into the inventoryStateList.
Note: If a command fails its execution, it will not call Model#commitInventory(), so the inventory
state will not be saved into the inventoryStateList.
Step 4. The user now decides that adding the item was a mistake, and decides to undo that action by executing the
undo command. The undo command will call Model#undoInventory(), which will shift the currentStatePointer
once to the left, pointing it to the previous inventory state, and restores the inventory to that state.
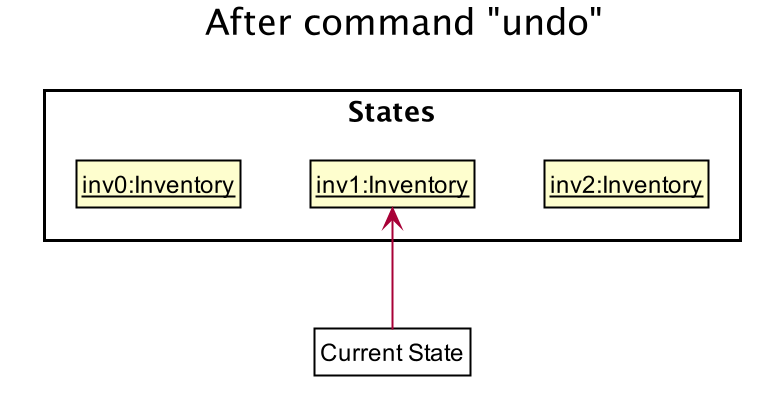
Note: If the currentStatePointer is at index 0, pointing to the initial Inventory state, then there are
no previous Inventory states to restore. The undo command checks if this is the case. If so, it will return
an error to the user rather than attempting to perform the undo.
The following sequence diagram shows how the undo operation works:
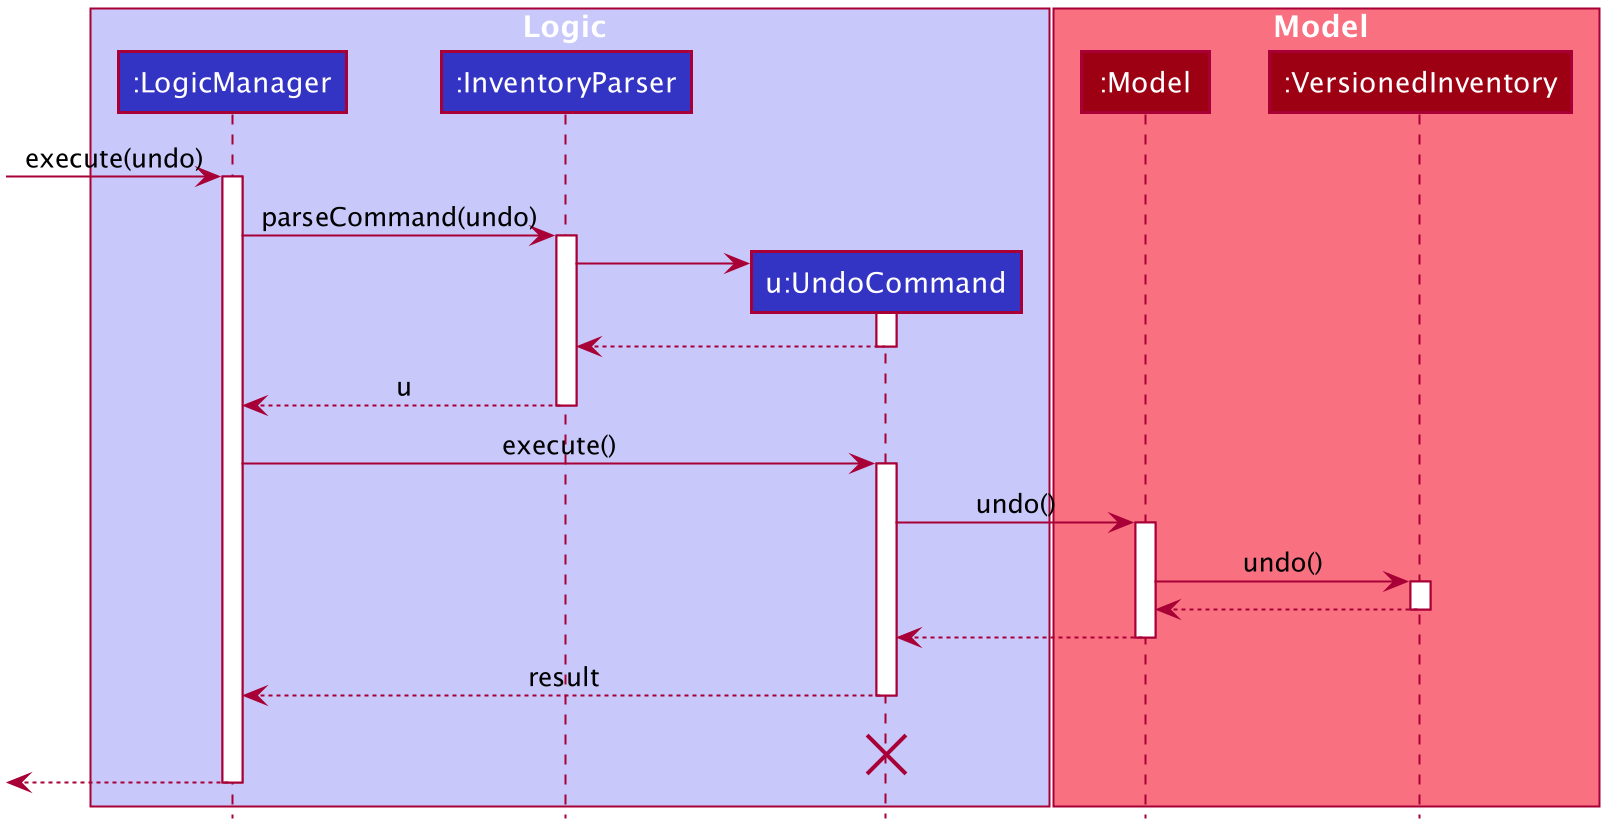 Note: The lifeline for
 UndoCommand should end at the destroy marker (X) but due to a
limitation of PlantUML, the lifeline reaches the end of diagram.
The redo command does the opposite — it calls Model#redoInventory(), which shifts the currentStatePointer
once to the right, pointing to the previously undone state, and restores the inventory to that state.
Note: If the currentStatePointer is at index inventoryStateList.size() - 1, pointing to the
latest inventory state, then there are no undone Inventory states to restore. The redo command checks if this
is the case. If so, it will return an error to the user
rather than attempting to perform the redo.
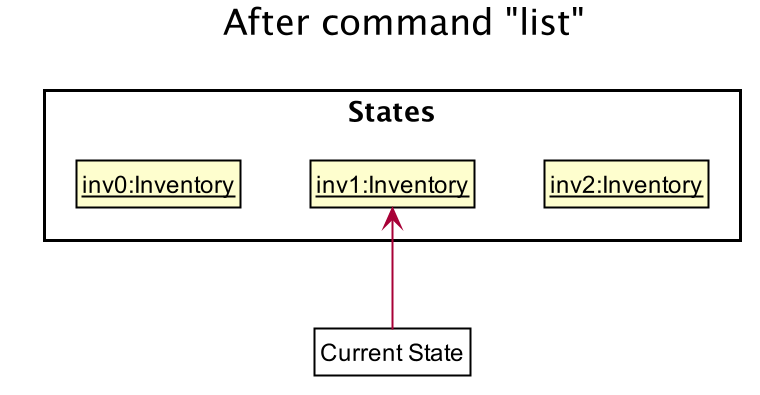
Step 5. The user then decides to execute the command listi. Commands that do not modify the inventory, such as
listi, will usually not call Model#commitInventory(), Model#undoInventory() or Model#redoInventory().
Thus, the inventoryStateList remains unchanged.
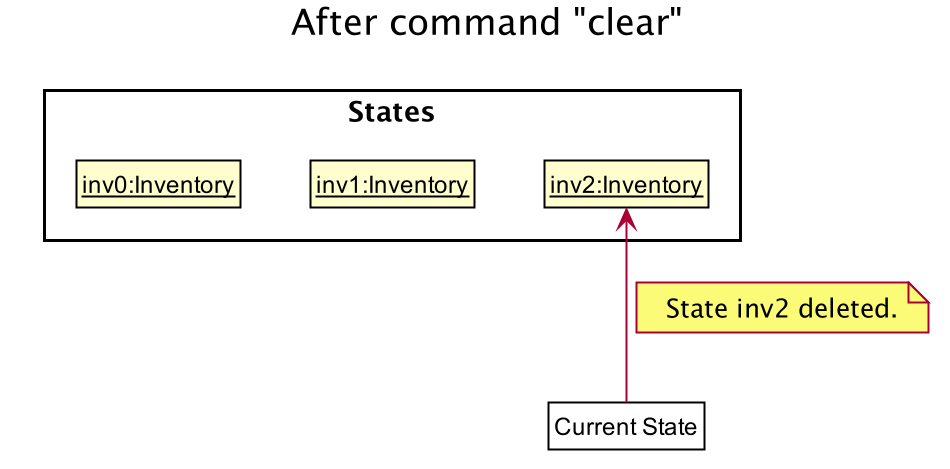
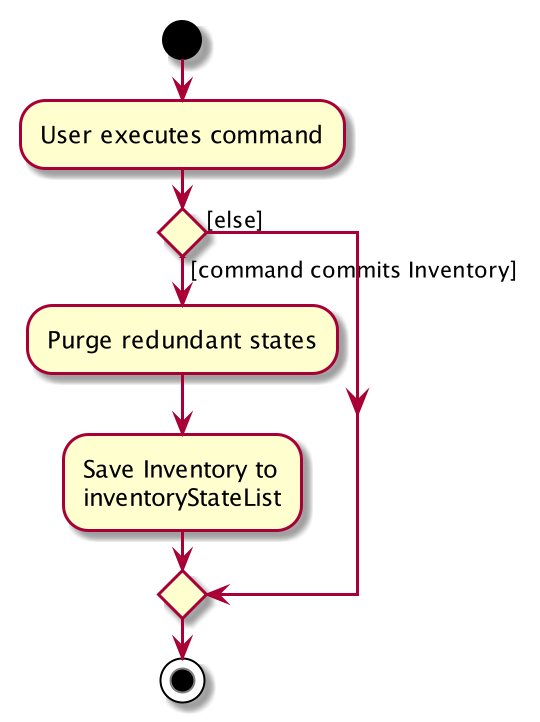
Step 6. The user executes clear, which calls Model#commitInventory(). Since the currentStatePointer
is not pointing at the end of the inventoryStateList, all inventory states after the currentStatePointer
will be purged. Reason: It no longer makes sense to redo the addi -n Bob’s 6th regret -q 8 command. This is the
behavior that most modern desktop applications follow.
The following activity diagram summarizes what happens when a user executes a new command:
Design consideration:
Aspect: How undo & redo executes
- Alternative 1 (current choice): Saves the entire inventory.
- Pros: Easy to implement.
- Cons: May have performance issues in terms of memory usage.
- Alternative 2: Store a stack of commands that have been run.
- Pros: We store a stack of commands which is added to whenever the user runs a new command that modifies the inventory state. When undo is invoked, the stack is popped and added to a redo stack, and the command will be negated and run. When redo is invoked, the redo stack is popped, and the command is run.
- Cons: Harder to implement as each command has to be negated individually. This has considerably many edge cases to consider.
Appendix: Requirements
Product scope
Target user profile:
- has a need to manage a significant number of items in a game.
- prefers desktop apps over other types
- can type fast
- prefers typing to mouse interactions
- is very comfortable using CLI apps
Value proposition: manage inventory faster than a typical mouse/GUI driven app
User stories for V1.4
Priorities: High (must have) - * * *, Medium (nice to have) - * *, Low (unlikely to have) - *
| Priority | As a … | I want to … | So that I can… |
|---|---|---|---|
* * * |
new user | see usage instructions | refer to instructions when I forget how to use the App |
* * * |
user | add a new item | |
* * * |
user | add quantity to an item | track the items that I have managed in my inventory |
* * * |
user | add tags to an item | classify the items i have managed in my inventory |
* * * |
user | add a recipe | |
* * * |
user | edit a item | to ensure that all parameters in the item are updated correctly |
* * * |
user | delete an item | remove item that I no longer need to track |
* * * |
user | delete a recipe | remove recipes that I no longer need to use |
* * * |
user | find an item by name | locate details of items without having to go through the entire list |
* * * |
user | find an item by tags | locate details of items without having to go through the entire list |
| Priority | As a … | I want to … | So that I can… |
|---|---|---|---|
* * * |
user | list all my items | visually see what items are currently stored in my inventory |
* * * |
user | list all my recipes | visually see what recipes are currently stored in my inventory |
* * * |
user | see a detailed view of an item | see recipes associated with this item |
* * |
user | tag an item by location | locate items by where they are located |
* * |
user | tag an item using custom tags | further organise and categorise my items |
* * |
user | undo commands | revert changes that I no longer want |
* * |
user | redo commands | revert changes that I actually want |
* * |
user | craft items | easily craft what I want from the items I have in my inventory |
* * |
user | simulate crafting | easily find out if I have enough items to make what I want |
* |
user | clear all items | clear this inventory of items to use it to track another game |
* |
user | clear all recipes | clear the clutter in my inventory |
Non-Functional Requirements
- Should work on any mainstream OS as long as it has Java
11or above installed. - Should be able to hold up to 1000 items and recipes without noticeable sluggishness in performance for typical usage.
- A user with above average typing speed for regular English text (i.e. not code, not system admin commands) should be able to accomplish most of the tasks faster using commands than using the mouse.
- A user should be able to view visually the output from the application.
- Should work without requiring internet connectivity.
Glossary
This is a reference for technical terms that you may need to refer to when reading this developer guide.
- Mainstream OS: Windows, Linux, Unix, OS-X
- GUI: The graphical user interface is a form of user interface that allows users to interact with electronic devices through graphical icons and audio indicator such as primary notation.
- Parameter: a user input to be used by the application
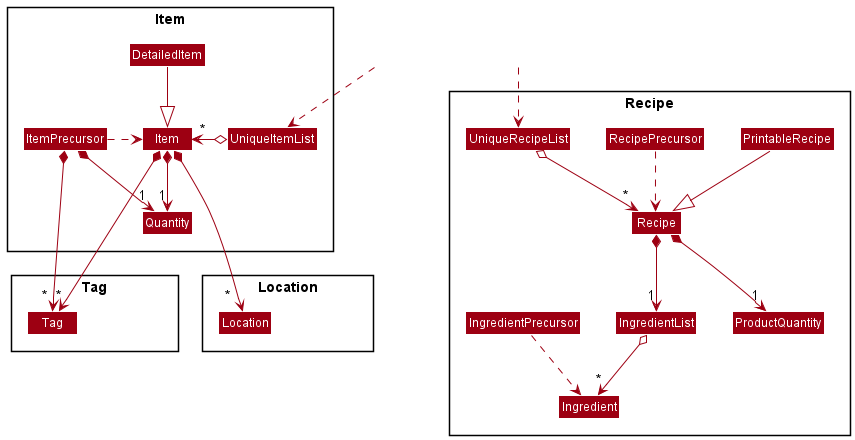
- Item: An item represents an object you obtain in a game. Eg a Rock
- Recipe: A recipe is associated with multiple items, and represents the consumption of items in the input, to produce an item of the output. Eg: 3 Sticks -> Staff
- Location: The place where an item can be found in game. Eg: Sleepywood
- Inventory: The entire state of the Inventoryinator, including recipes, items, locations etc.